Description
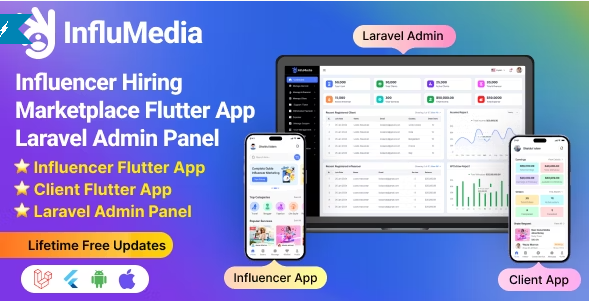
InfluMedia is a powerful and user-friendly influencer hiring marketplace designed to connect influencers with potential clients seamlessly. Built with Flutter for the mobile app and Laravel for the backend and API, InfluMedia offers a smooth and efficient platform for influencers to showcase their services and for clients to hire the perfect influencers for their needs.
Admin Url: https://influncer.acnoohost.com/login
Super Admin Credentials
User: superadmin@superadmin.com
Password: superadmin
Admin Credentials
User: admin@admin.com
Password: superadmin
Manager Credentials
User: manager@manager.com
Password: manager
Offer: If you buy the extended license you will get free reskin service and full setup


Envato suggests buying an extended license for a SaaS project.
Influencer Admin Panel Menu Descriptions:
1. Dashboard:
- Overview of the system’s performance and key metrics.
2. Banner:
- Manage the banners displayed on the platform, including promotional banners, campaign highlights, and featured influencers. Admins can upload, edit, and schedule banners to be displayed on the app’s home page or specific sections.
3. Manage Service:
- Oversee and manage the services offered by influencers on the platform. Admins can create, update, or remove service categories and types, ensuring the service listings remain relevant and up-to-date.
4. Manage Influencer:
- Administer all influencer accounts registered on the platform. This includes verifying profiles, managing influencer details, reviewing performance metrics, and handling any compliance issues.
5. Manage Clients:
- Manage client (business/brand) accounts. Admins can view client profiles, track campaign activities, and ensure that clients adhere to platform policies.
6. Support Ticket:
- Monitor and resolve support tickets submitted by influencers or clients. Admins can categorize tickets, assign them to appropriate support agents, and track the resolution process.
7. Withdrawal Payment:
- Oversee and process withdrawal requests submitted by influencers. Admins can verify the requests, approve or reject them, and manage the payment disbursement process.
8. Expense:
- Track and manage all platform-related expenses. This includes payments made to influencers, operational costs, marketing expenses, and other financial outflows.
9. Manage Coupon:
- Create, edit, and manage discount coupons that can be used by clients for promotional campaigns. Admins can set coupon parameters such as discount percentage, expiration date, and eligible services.
10. User Management:
- Administer all user accounts on the platform, including both influencers and clients. This section includes tools for user verification, profile editing, account suspension, and monitoring user activity.
11. Manage Order:
- Track and manage all orders placed by clients for influencer services. Admins can view order details, update order statuses, and handle any order-related issues.
12. Complain:
- Handle complaints submitted by users, whether influencers or clients. Admins can investigate complaints, communicate with involved parties, and take appropriate action to resolve issues.
13. Refund Request:
- Manage refund requests submitted by clients. Admins can review the circumstances of the request, approve or deny refunds, and process any necessary transactions.
14. Report Type:
- Define and manage different types of reports that users can submit, such as reports for inappropriate content, fraudulent activity, or service issues. Admins can categorize these report types and set up automated responses or actions.
15. Reports:
- Access a comprehensive suite of reports related to platform activity. This includes financial reports, user engagement metrics, campaign performance reports, and more. Admins can generate, view, and export these reports for further analysis.
16. CMS Manage:
- Manage the Content Management System (CMS) for the platform. Admins can update and edit content across the app, including FAQs, terms and conditions, privacy policies, and other static pages.
17. Roles & Permissions:
- Define and assign roles to different users within the admin panel. Admins can create custom roles, assign specific permissions, and control access to various features and sections of the admin panel.
18. Settings:
- Configure the overall settings of the platform. This includes adjusting platform-wide parameters, payment gateway settings, notification settings, and other critical configurations to ensure the platform runs smoothly.
Features for Influencers(App):
1. Profile Creation & Management:
- Create and manage a detailed profile showcasing skills, follower demographics, previous collaborations, content samples, and social media analytics.
- Link multiple social media accounts for better visibility.
- Set availability, preferred collaboration types, and pricing.
2. Campaign Listings:
- Browse available campaigns based on niche, budget, and target audience.
- Apply for campaigns by submitting proposals.
- Receive direct collaboration offers from customers.
3. Messaging System:
- In-app messaging to communicate directly with potential clients.
- Notifications for new messages, campaign offers, and updates.
4. Earnings Dashboard:
- Track earnings, pending payments, and transaction history.
- Secure payment withdrawal options through various payment gateways.
5. Review & Rating System:
- Receive reviews and ratings from customers after each collaboration.
- Build a reputation based on completed projects and customer feedback.
6. Campaign Management:
- Manage ongoing campaigns, deliverables, and deadlines.
- Submit content for approval directly through the app.
Features for Client (App):
1. Account Setup & Dashboard:
- Easy account creation with options to specify business details, target audience, and campaign goals.
- A dashboard to track active campaigns, budget, and performance.
2. Influencer Discovery:
- Search and filter influencers based on niche, follower count, engagement rate, location, and pricing.
- View influencer profiles, portfolios, and previous work.
3. Campaign Creation:
- Create detailed campaign briefs specifying goals, budget, deliverables, and timelines.
- Invite specific influencers to apply or post campaigns publicly.
4. Proposal Management:
- Review and manage proposals from influencers.
- Negotiate terms, pricing, and deadlines through in-app communication.
5. Contract & Payment Handling:
- Secure contract creation and management with selected influencers.
- Manage payments through escrow or direct payment systems, ensuring influencer payments are released upon successful campaign completion.
6. Campaign Analytics:
- Access real-time analytics on campaign performance, including reach, engagement, and ROI.
7. Review & Rating System:
- Provide reviews and ratings for influencers after the campaign ends.
- Build a network of trusted influencers for future collaborations.
Technology Stack:
Frontend: Flutter (Dart)
Backend: Laravel (PHP)
Database: MySQL/PostgreSQL
Payment Gateway Integration: Stripe, PayPal, etc.
Real-time Messaging: WebSocket/Socket.io
Flutter and Android Studio Setup Guide
Follow these steps to set up your development environment for Flutter:
Step 1: Install Flutter
Download and install Flutter by following the official instructions:
Step 2: Install Android Studio
Download and install Android Studio from the official website:
Step 3: Set Up Android Studio
- Open Android Studio.
- Go to File > Settings (on macOS, go to Android Studio > Preferences).
- Navigate to Appearance & Behavior > System Settings > Android SDK.
- Ensure that the Android SDK and necessary tools are installed.
Step 4: Configure Flutter in Android Studio
- Open Android Studio.
- Go to File > Settings (on macOS, go to Android Studio > Preferences).
- Navigate to Plugins and search for “Flutter”.
- Install the Flutter plugin and restart Android Studio.
- After restarting, open File > New > New Flutter Project to start a new Flutter project.
Step 5: Set Up Your Device
- Enable Developer Mode on your Android device.
- Enable USB Debugging from the Developer Options.
- Connect your device to your computer via USB.
Once you have completed these steps, you are ready to start developing with Flutter and Android Studio.

